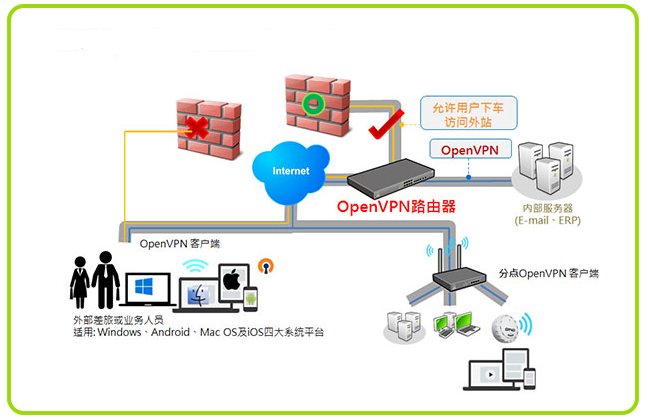
OpenVPN
本文最后更新于:2023年12月5日 晚上
OpenVPN 简介
VPN
专用网:需要向电信运行商申请租用专线,在这条专用的线路上只传输自己的信息,安全稳定,但费用高昂。
VPN:Virtual Private Network,虚拟私有网络,又称为虚拟专用网络,用于在不安全的线路上安全的传输数据。
OpenVPN
OpenVPN:一个实现 VPN 的开源软件,OpenVPN 是一个健壮的、高度灵活的 VPN 守护进程。它支持 SSL/TLS 安全、Ethernet bridging、经由代理的 TCP 或 UDP 隧道和 NAT。另外,它也支持动态 IP 地址以及 DHCP,可伸缩性足以支持数百或数千用户的使用场景,同时可移植至大多数主流操作系统平台上。
官网:https://openvpn.net
GitHub 地址:https://github.com/OpenVPN/openvpn
原理
参考链接:
https://baike.baidu.com/item/OpenVPN
https://www.bbsmax.com/A/MAzAkpvq59/
https://zhuanlan.zhihu.com/p/28727570
客户端和服务端都需要安装 OpenVPN,OpenVPN 的技术核心是虚拟网卡和 SSL 协议,我们知道,物理网卡工作在数据链路层,而虚拟网卡即可以工作在数据链路层,也可以工作在网络层,这取决于设置 tun 模式还是 tap 模式,客户端和服务端的虚拟网卡配置的 IP 处于同一个网段(10.8.0.0/24),客户端和服务端通过虚拟网卡通信,这样虽然中间隔着互联网,但就好像在一个局域网中一样
通信过程
- 服务器 OpenVPN 配置一个静态的虚拟 IP(10.8.0.1)和一个虚拟 IP 池(10.8.0.2 - 1.0.8.254),为每一个成功建立 SSL 连接的客户端 OpenVPN 分配一个虚拟 IP 池中的 IP,然后将局域网网段、路由设置等信息推送给客户端 OpenVPN,这样,客户端就成功加入了虚拟的局域网
- 在 OpenVpn 中,如果用户访问一个远程的虚拟地址(属于虚拟网卡配用的地址系列,区别于真实地址),则操作系统会通过路由机制将数据包(TUN 模式)或数据帧(TAP 模式)发送到虚拟网卡上,服务程序接收该数据并进行相应的处理后,通过 SOCKET 从外网上发送出去,远程服务程序通过 SOCKET 从外网上接收数据,并进行相应的处理后,发送给虚拟网卡,则应用软件可以接收到,完成了一个单向传输的过程,反之亦然。
- 通信过程加密,支持 TCP 和 UDP
VPN 和 SSH
我们知道,SSH 具有隧道转发的功能,它和 VPN 一样,都可以加密网络流量,实现安全通信,但是两者还是有很大的不同:….
OpenVPN 部署
10.0.0.2 56hpnM
准备 OpenVPN 部署环境
需要四台主机,一台客户端,一台 OpenVPN 服务器,两台内网服务器。
三台服务从阿里云购买,OpenVPN 服务器需要配置公网 IP,两台内网服务器不需要配置公网 IP。
配置 OpenVPN 服务器
安装
- 编译安装的 openvpn 总是无法启动,每次都启动超时,不知道为什么,所以还是通过 yum 来安装吧
# OpenVPN
[root@4710419222 /]$yum -y install openvpn
# 证书管理工具
[root@4710419222 /]$cd /usr/local/src
[root@4710419222 src]$wget https://github.com/OpenVPN/easy-rsa/releases/download/v3.0.8/EasyRSA-3.0.8.tgz
[root@4710419222 src]$tar zxvf EasyRSA-3.0.8.tgz
easy-rsa:证书管理工具,负责建立私有 CA、颁发管理证书等工作,通过调用 openssl 来实现功能,所以 easy-rsa 能实现的功能,openssl 都能实现,只是更麻烦一些
- 准备相关配置文件
# 配置文件
cp /usr/share/doc/openvpn-2.4.9/sample/sample-config-files/server.conf /etc/openvpn
# 证书签发相关文件
mkdir -p /etc/openvpn/easy-rsa-{server,client}
cp -r /usr/local/src/EasyRSA-3.0.8/{easyrsa,vars.example,x509-types,openssl-easyrsa.cnf} /etc/openvpn/easy-rsa-server/
cp -r /usr/local/src/EasyRSA-3.0.8/{easyrsa,vars.example,x509-types,openssl-easyrsa.cnf} /etc/openvpn/easy-rsa-client/
mv /etc/openvpn/easy-rsa-server/vars.example /etc/openvpn/easy-rsa-server/vars
mv /etc/openvpn/easy-rsa-client/vars.example /etc/openvpn/easy-rsa-client/vars
[root@4710419222 openvpn]$tree
.
├── client
├── easy-rsa-client
│   ├── easyrsa
│   ├── openssl-easyrsa.cnf
│   ├── vars
│   └── x509-types
│       ├── ca
│       ├── client
│       ├── code-signing
│       ├── COMMON
│       ├── email
│       ├── kdc
│       ├── server
│       └── serverClient
├── easy-rsa-server
│   ├── easyrsa
│   ├── openssl-easyrsa.cnf
│   ├── vars
│   └── x509-types
│       ├── ca
│       ├── client
│       ├── code-signing
│       ├── COMMON
│       ├── email
│       ├── kdc
│       ├── server
│       └── serverClient
├── server
└── server.conf

7 directories, 23 files
准备证书相关文件
1. 查看初始文件
[root@4710419222 openvpn]$pwd
/etc/openvpn
[root@4710419222 openvpn]$cd easy-rsa-server/
[root@4710419222 easy-rsa-server]$ll
total 100
-rwxr-xr-x 1 root root 76946 Oct  4 21:38 easyrsa
-rw-r--r-- 1 root root  4616 Oct  4 21:38 openssl-easyrsa.cnf
-rw-r--r-- 1 root root  8925 Oct  4 21:38 vars
drwxr-xr-x 2 root root  4096 Oct  4 21:38 x509-types
[root@4710419222 easy-rsa-server]$./easyrsa --version
EasyRSA Version Information
Version:     3.0.8
Generated:   Wed Sep  9 15:59:45 CDT 2020
SSL Lib:     OpenSSL 1.0.2k-fips  26 Jan 2017
Git Commit:  f12e00e53b4f486ce3d119ca429198780fa694ac
Source Repo: https://github.com/OpenVPN/easy-rsa
2. 初始化 PKI,生成 PKI 相关目录和文件
[root@4710419222 easy-rsa-server]$./easyrsa init-pki

Note: using Easy-RSA configuration from: /etc/openvpn/easy-rsa-server/vars

init-pki complete; you may now create a CA or requests.
Your newly created PKI dir is: /etc/openvpn/easy-rsa-server/pki


[root@4710419222 easy-rsa-server]$tree
.
├── easyrsa
├── openssl-easyrsa.cnf
├── pki  # 生成一个新目录及相关文件
│   ├── openssl-easyrsa.cnf
│   ├── private
│   ├── reqs
│   └── safessl-easyrsa.cnf
├── vars
└── x509-types
    ├── ca
    ├── client
    ├── code-signing
    ├── COMMON
    ├── email
    ├── kdc
    ├── server
    └── serverClient

4 directories, 13 files
3. 创建私有 CA 机构
[root@4710419222 easy-rsa-server]$./easyrsa build-ca nopass

Note: using Easy-RSA configuration from: /etc/openvpn/easy-rsa-server/vars
Using SSL: openssl OpenSSL 1.0.2k-fips  26 Jan 2017
Generating RSA private key, 2048 bit long modulus
...........................+++
...................................................................................+++
e is 65537 (0x10001)
You are about to be asked to enter information that will be incorporated
into your certificate request.
What you are about to enter is what is called a Distinguished Name or a DN.
There are quite a few fields but you can leave some blank
For some fields there will be a default value,
If you enter '.', the field will be left blank.
-----
Common Name (eg: your user, host, or server name) [Easy-RSA CA]: # 接受默认值,直接回车

CA creation complete and you may now import and sign cert requests.
Your new CA certificate file for publishing is at:
/etc/openvpn/easy-rsa-server/pki/ca.crt  # 生成自签名的证书文件


[root@4710419222 easy-rsa-server]$tree
.
├── easyrsa
├── openssl-easyrsa.cnf
├── pki
│   ├── ca.crt    # 生成自签名的证书文件
│   ├── certs_by_serial
│   ├── index.txt   # 数据库文件
│   ├── index.txt.attr
│   ├── issued
│   ├── openssl-easyrsa.cnf
│   ├── private
│   │   └── ca.key   # 生成私钥文件
│   ├── renewed
│   │   ├── certs_by_serial
│   │   ├── private_by_serial
│   │   └── reqs_by_serial
│   ├── reqs
│   ├── revoked
│   │   ├── certs_by_serial
│   │   ├── private_by_serial
│   │   └── reqs_by_serial
│   ├── safessl-easyrsa.cnf
│   └── serial    # CA serial number file
├── vars
└── x509-types
    ├── ca
    ├── client
    ├── code-signing
    ├── COMMON
    ├── email
    ├── kdc
    ├── server
    └── serverClient

14 directories, 18 files
4. 创建服务端证书申请
首先生成私钥,然后使用私钥生成证书申请文件
[root@4710419222 easy-rsa-server]$./easyrsa gen-req server nopass

Note: using Easy-RSA configuration from: /etc/openvpn/easy-rsa-server/vars
Using SSL: openssl OpenSSL 1.0.2k-fips  26 Jan 2017
Generating a 2048 bit RSA private key
....................+++
.......................................................................................................................................................................................................................................+++
writing new private key to '/etc/openvpn/easy-rsa-server/pki/easy-rsa-2906.nnaLFU/tmp.yVgZX9'
-----
You are about to be asked to enter information that will be incorporated
into your certificate request.
What you are about to enter is what is called a Distinguished Name or a DN.
There are quite a few fields but you can leave some blank
For some fields there will be a default value,
If you enter '.', the field will be left blank.
-----
Common Name (eg: your user, host, or server name) [server]: # 默认值,直接回车

Keypair and certificate request completed. Your files are:
req: /etc/openvpn/easy-rsa-server/pki/reqs/server.req  # 生成请求文件
key: /etc/openvpn/easy-rsa-server/pki/private/server.key # 生成私钥文件


[root@4710419222 easy-rsa-server]$tree pki
pki
├── ca.crt
├── certs_by_serial
├── index.txt
├── index.txt.attr
├── issued
├── openssl-easyrsa.cnf
├── private
│   ├── ca.key
│   └── server.key   # 生成私钥文件
├── renewed
│   ├── certs_by_serial
│   ├── private_by_serial
│   └── reqs_by_serial
├── reqs
│   └── server.req   # 生成请求文件
├── revoked
│   ├── certs_by_serial
│   ├── private_by_serial
│   └── reqs_by_serial
├── safessl-easyrsa.cnf
└── serial

12 directories, 9 files
5. 颁发服务端证书
# 查看命令用法,
[root@4710419222 easy-rsa-server]$./easyrsa help sign

Note: using Easy-RSA configuration from: /etc/openvpn/easy-rsa-server/vars

  sign-req <type> <filename_base>
      Sign a certificate request of the defined type. <type> must be a known
      type such as 'client', 'server', 'serverClient', or 'ca' (or a user-added type.)

      This request file must exist in the reqs/ dir and have a .req file
      extension. See import-req below for importing reqs from other sources.

# 颁发服务端证书
[root@4710419222 easy-rsa-server]$./easyrsa sign server server

Note: using Easy-RSA configuration from: /etc/openvpn/easy-rsa-server/vars
Using SSL: openssl OpenSSL 1.0.2k-fips  26 Jan 2017


You are about to sign the following certificate.
Please check over the details shown below for accuracy. Note that this request
has not been cryptographically verified. Please be sure it came from a trusted
source or that you have verified the request checksum with the sender.

Request subject, to be signed as a server certificate for 825 days:

subject=
    commonName                = server


Type the word 'yes' to continue, or any other input to abort.
  Confirm request details: yes  # 输入yes,回车
Using configuration from /etc/openvpn/easy-rsa-server/pki/easy-rsa-3000.Ova1sM/tmp.xCpj0p
Check that the request matches the signature
Signature ok
The Subject's Distinguished Name is as follows
commonName            :ASN.1 12:'server'
Certificate is to be certified until Jan  7 14:03:25 2023 GMT (825 days)

Write out database with 1 new entries
Data Base Updated

Certificate created at: /etc/openvpn/easy-rsa-server/pki/issued/server.crt # 生成的证书


[root@4710419222 easy-rsa-server]$tree pki
pki
├── ca.crt
├── certs_by_serial
│   └── 61A86BA6C8B9482479FEF411570C8654.pem # 服务器证书文件
├── index.txt
├── index.txt.attr
├── index.txt.attr.old
├── index.txt.old
├── issued
│   └── server.crt
├── openssl-easyrsa.cnf
├── private
│   ├── ca.key
│   └── server.key  # 服务器证书文件,这两个文件是一样的
├── renewed
│   ├── certs_by_serial
│   ├── private_by_serial
│   └── reqs_by_serial
├── reqs
│   └── server.req
├── revoked
│   ├── certs_by_serial
│   ├── private_by_serial
│   └── reqs_by_serial
├── safessl-easyrsa.cnf
├── serial
└── serial.old

12 directories, 14 files
6. 创建 Diffie-Hellman 密钥
DH 密钥,用于 SSL 加密通信
[root@4710419222 easy-rsa-server]$./easyrsa gen-dh

Note: using Easy-RSA configuration from: /etc/openvpn/easy-rsa-server/vars
Using SSL: openssl OpenSSL 1.0.2k-fips  26 Jan 2017
Generating DH parameters, 2048 bit long safe prime, generator 2
This is going to take a long time
..................................................+.......................+........................................................................................................+.........................................+..................................................................................... # 需要等一会
[root@4710419222 easy-rsa-server]$ll ./pki/dh.pem
-rw------- 1 root root 424 Oct  4 22:09 ./pki/dh.pem
7. 准备客户端证书环境
上面服务端证书配置完成,下面是配置客户端证书
[root@4710419222 easy-rsa-server]$cd ../easy-rsa-client/
[root@4710419222 easy-rsa-client]$pwd
/etc/openvpn/easy-rsa-client
[root@4710419222 easy-rsa-client]$ll
total 100
-rwxr-xr-x 1 root root 76946 Oct  4 21:38 easyrsa
-rw-r--r-- 1 root root  4616 Oct  4 21:38 openssl-easyrsa.cnf
-rw-r--r-- 1 root root  8925 Oct  4 21:38 vars
drwxr-xr-x 2 root root  4096 Oct  4 21:38 x509-types
[root@4710419222 easy-rsa-client]$tree
.
├── easyrsa
├── openssl-easyrsa.cnf
├── vars
└── x509-types
    ├── ca
    ├── client
    ├── code-signing
    ├── COMMON
    ├── email
    ├── kdc
    ├── server
    └── serverClient

1 directory, 11 files
# 初始化pki,和上面步骤一样,就不详细介绍了
[root@4710419222 easy-rsa-client]$./easyrsa init-pki
8. 创建客户端证书申请
[root@4710419222 easy-rsa-client]$./easyrsa gen-req lujinkai nopass

Note: using Easy-RSA configuration from: /etc/openvpn/easy-rsa-client/vars
Using SSL: openssl OpenSSL 1.0.2k-fips  26 Jan 2017
Generating a 2048 bit RSA private key
.................+++
........................+++
writing new private key to '/etc/openvpn/easy-rsa-client/pki/easy-rsa-3187.Tyzo2P/tmp.KswAlv'
-----
You are about to be asked to enter information that will be incorporated
into your certificate request.
What you are about to enter is what is called a Distinguished Name or a DN.
There are quite a few fields but you can leave some blank
For some fields there will be a default value,
If you enter '.', the field will be left blank.
-----
Common Name (eg: your user, host, or server name) [lujinkai]: # 默认,回车

Keypair and certificate request completed. Your files are:
req: /etc/openvpn/easy-rsa-client/pki/reqs/lujinkai.req  # 申请文件
key: /etc/openvpn/easy-rsa-client/pki/private/lujinkai.key # 私钥
9. 签发客户端证书
# 回到easy-rsa-server
[root@4710419222 easy-rsa-client]$cd ../easy-rsa-server/
# 将客户端证书请求文件复制到CA的工作目录,也可以使用cp命令
[root@4710419222 easy-rsa-server]$./easyrsa import-req /etc/openvpn/easy-rsa-client/pki/reqs/lujinkai.req lujinkai

Note: using Easy-RSA configuration from: /etc/openvpn/easy-rsa-server/vars
Using SSL: openssl OpenSSL 1.0.2k-fips  26 Jan 2017

The request has been successfully imported with a short name of: lujinkai
You may now use this name to perform signing operations on this request.


[root@4710419222 easy-rsa-server]$tree pki/reqs/
pki/reqs/
├── lujinkai.req # 复制过来的申请文件
└── server.req

0 directories, 2 files
# 签发客户端证书
[root@4710419222 easy-rsa-server]$./easyrsa sign client lujinkai

Note: using Easy-RSA configuration from: /etc/openvpn/easy-rsa-server/vars
Using SSL: openssl OpenSSL 1.0.2k-fips  26 Jan 2017


You are about to sign the following certificate.
Please check over the details shown below for accuracy. Note that this request
has not been cryptographically verified. Please be sure it came from a trusted
source or that you have verified the request checksum with the sender.

Request subject, to be signed as a client certificate for 825 days:

subject=
    commonName                = lujinkai


Type the word 'yes' to continue, or any other input to abort.
  Confirm request details: yes # 输入yes,回车
Using configuration from /etc/openvpn/easy-rsa-server/pki/easy-rsa-3291.YugvYL/tmp.xXkvue
Check that the request matches the signature
Signature ok
The Subject's Distinguished Name is as follows
commonName            :ASN.1 12:'lujinkai'
Certificate is to be certified until Jan  7 14:24:14 2023 GMT (825 days)

Write out database with 1 new entries
Data Base Updated

Certificate created at: /etc/openvpn/easy-rsa-server/pki/issued/lujinkai.crt


[root@4710419222 easy-rsa-server]$tree pki/issued/
pki/issued/
├── lujinkai.crt # 签发的客户端证书
└── server.crt

0 directories, 2 files
10. 将 ca 和服务器相关文件复制到服务器相应的目录
[root@4710419222 openvpn]$pwd
/etc/openvpn
[root@4710419222 openvpn]$cp -r ./easy-rsa-server/pki/{ca.crt,issued/server.crt,private/server.key,dh.pem} ./certs/
[root@4710419222 openvpn]$ll ./certs/
total 20
-rw------- 1 root root 1172 Oct  5 18:48 ca.crt
-rw------- 1 root root  424 Oct  5 18:48 dh.pem
-rw------- 1 root root 4547 Oct  5 18:48 server.crt
-rw------- 1 root root 1704 Oct  5 18:48 server.key
11. 将 ca 和客户端相关文件复制到服务器相关的目录
[root@4710419222 openvpn]$cp easy-rsa-server/pki/{ca.crt,issued/lujinkai.crt} client/
[root@4710419222 openvpn]$cp easy-rsa-client/pki/private/lujinkai.key client/
[root@4710419222 openvpn]$ll client/
total 16
-rw------- 1 root root 1172 Oct  5 18:52 ca.crt
-rw------- 1 root root 4431 Oct  5 18:52 lujinkai.crt
-rw------- 1 root root 1708 Oct  5 18:52 lujinkai.key
准备 OpenVPN 服务端配置文件
配置文件说明
# grep -Ev '^#|^$' server.conf 或:
[root@4710419222 openvpn]$sed -e '/^#/d' -e '/^$/d' server.conf
;local a.b.c.d # 本机监听IP,默认为本机所有IP
port 1194
;proto tcp
proto udp
;dev tap # 创建一个以太网隧道,tap模拟以太网设备,工作在第二层
dev tun  # 创建一个路由IP隧道,tun模拟网络层设备,工作在第三层
;dev-node MyTap  # TAP-Win32适配器。非windows不需要配置
ca ca.crt   # ca证书文件
cert server.crt  # 服务器证书文件
key server.key  # 服务器私钥文件  # This file should be kept secret
dh dh2048.pem  # dh参数文件
;topology subnet # 拓扑类型:默认是net30模式,很浪费IP地址,建议开启subnet模式
server 10.8.0.0 255.255.255.0 # 客户端建立ssl连接后分配IP的连接池,服务器默认占用第一个IP 10.8.0.1
ifconfig-pool-persist ipp.txt # 为客户端分配固定的IP
;server-bridge 10.8.0.4 255.255.255.0 10.8.0.50 10.8.0.100 # 配置网桥模式
;server-bridge
;push "route 192.168.10.0 255.255.255.0" # 推送路由设置给客户端,设置私网地址
;push "route 192.168.20.0 255.255.255.0"
;client-config-dir ccd  # 指定的客户端添加路由,此路由通常是客户端后面的内网网段
;route 192.168.40.128 255.255.255.248
;client-config-dir ccd
;route 10.9.0.0 255.255.255.252
;learn-address ./script  # 运行外部脚本,创建不同组的iptables规则
;push "redirect-gateway def1 bypass-dhcp" # 启用后,客户端所有流量都将通过VPN服务器
;push "dhcp-option DNS 208.67.222.222"  # 推送DNS服务器
;push "dhcp-option DNS 208.67.220.220"
;client-to-client  # 允许不同的client直接通信,不安全,生产环境一般不配置
;duplicate-cn  # 多个用户共用一个证书,一般用于测试环境,生产环境都是一个用户一个证书
keepalive 10 120 # 心跳,10秒ping一次,120秒没有回应则认为对方已经down
# 访止DoS等攻击的安全增强配置,可以使用openvpn命令生成:openvpn --genkey --secret ta.key
# 服务器和每个客户端都需要拥有该密钥的一个拷贝。第二个参数在服务器端应该为’0’,在客户端应该为’1’
tls-auth ta.key 0 # This file is secret
cipher AES-256-CBC # 加密算法
;compress lz4-v2 # 启用Openvpn2.4.X新版压缩算法
;push "compress lz4-v2" # 推送客户端使用新版压缩算法,和下面的comp-lzo不要同时使用
;comp-lzo # 旧户端兼容的压缩配置,需要客户端配置开启压缩,openvpn2.4.X等新版可以不用开启
;max-clients 100 # 最大客户端数
;user nobody # 运行openvpn服务的用户和组
;group nobody
persist-key  # 重启VPN服务时默认会重新读取key文件
persist-tun  # 重启vpn服务时,一直保持tun或者tap设备是up的,否则会先down然后再up
status openvpn-status.log # openVPN状态记录文件,每分钟会记录一次
;log         openvpn.log # 指定日志路径,log会在openvpn启动的时候清空日志文件
;log-append  openvpn.log # 指定日志路径,重启openvpn后在之前的日志后面追加新的日志
# 设置日志级别,0-9,级别越高记录的内容越详细,0 表示静默运行,只记录致命错误,4 表示合理的常规用法,5 和 6 可以帮助调试连接错误。9 表示极度冗余,输出非常详细的日志信息
verb 3
;mute 20 # 相同类别的信息只有前20条会输出到日志文件中
# 通知客户端,在服务端重启后自动重新连接,仅能用于udp模式,tcp模式不需要配置即可实现断开重新连接,且开启此项后tcp配置后将导致openvpn服务无法启动,所以tcp时必须不能开启此项
explicit-exit-notify 1
修改服务端配置文件
port 1194
proto tcp
dev tun
ca /etc/openvpn/certs/ca.crt
cert /etc/openvpn/certs/server.crt
key /etc/openvpn/certs/server.key  # This file should be kept secret
dh /etc/openvpn/certs/dh.pem
topology subnet
server 10.8.0.0 255.255.255.0
push "route 10.0.0.0 255.255.255.0"
keepalive 10 120
max-clients 1024
user openvpn
group openvpn
status /var/log/openvpn/openvpn-status.log
log-append  /var/log/openvpn/openvpn.log
verb 9
mute 20
准备日志相关
[root@4710419222 ~]$getent passwd openvpn
openvpn:x:995:993:OpenVPN:/etc/openvpn:/sbin/nologin
[root@4710419222 ~]$mkdir /var/log/openvpn
[root@4710419222 ~]$chown openvpn.openvpn /var/log/openvpn
配置防火墙和内核参数
# 开启ip_forward
[root@4710419222 ~]$echo 1 > /proc/sys/net/ipv4/ip_forward
# 添加snat规则
[root@4710419222 ~]$nft list ruleset
table ip nat {
        chain postrouting {
                type nat hook postrouting priority srcnat; policy accept;
                ip saddr 10.8.0.0/24 masquerade
        }
}
比较奇怪的是以上设置不对,好像 nftables 不行,只能使用 iptables,于是关掉 nftables,设置 iptables:
[root@4710419222 nftables]$iptables -t nat -A POSTROUTING -s 10.8.0.0/24 -j MASQUERADE启动 OpenVPN
[root@4710419222 ~]$systemctl start openvpn@server
[root@4710419222 ~]$systemctl status openvpn@server
● openvpn@server.service - OpenVPN Robust And Highly Flexible Tunneling Application On server
   Loaded: loaded (/usr/lib/systemd/system/openvpn@.service; disabled; vendor preset: disabled)
   Active: active (running) since Wed 2020-10-07 17:41:08 CST; 2s ago
 Main PID: 10185 (openvpn)
   Status: "Initialization Sequence Completed"
   CGroup: /system.slice/system-openvpn.slice/openvpn@server.service
           └─10185 /usr/sbin/openvpn --cd /etc/openvpn/ --config server.conf

Oct 07 17:41:08 4710419222 systemd[1]: Starting OpenVPN Robust And Highly Flexible Tunneling Application On server...
Oct 07 17:41:08 4710419222 systemd[1]: Started OpenVPN Robust And Highly Flexible Tunneling Application On server.
[root@4710419222 ~]$ss -ntl
State      Recv-Q Send-Q                                     Local Address:Port                                                    Peer Address:Port
LISTEN     0      32                                                     *:1194                                                               *:*
LISTEN     0      128                                                    *:3306                                                               *:*
LISTEN     0      128                                            127.0.0.1:6379                                                               *:*
LISTEN     0      128                                                    *:80                                                                 *:*
LISTEN     0      128                                                    *:22                                                                 *:*
LISTEN     0      128                                                    *:443                                                                *:*
LISTEN     0      128                                                    *:9501                                                               *:*
LISTEN     0      128                                                    *:8000                                                               *:*
[root@4710419222 ~]$ps aux | grep openvpn
openvpn  10185  0.0  0.3  75036  7420 ?        Ss   17:41   0:00 /usr/sbin/openvpn --cd /etc/openvpn/ --config server.conf
root     10232  0.0  0.0   9096   848 pts/1    R+   17:41   0:00 grep --color openvpn
[root@4710419222 ~]$ip a
1: lo: <LOOPBACK,UP,LOWER_UP> mtu 65536 qdisc noqueue state UNKNOWN group default qlen 1
    link/loopback 00:00:00:00:00:00 brd 00:00:00:00:00:00
    inet 127.0.0.1/8 scope host lo
       valid_lft forever preferred_lft forever
    inet6 ::1/128 scope host
       valid_lft forever preferred_lft forever
2: eth0: <BROADCAST,MULTICAST,UP,LOWER_UP> mtu 1500 qdisc pfifo_fast state UP group default qlen 1000
    link/ether 00:16:3e:05:9f:fc brd ff:ff:ff:ff:ff:ff
    inet 10.0.0.1/24 brd 10.0.0.255 scope global dynamic eth0
       valid_lft 315108100sec preferred_lft 315108100sec
    inet6 fe80::216:3eff:fe05:9ffc/64 scope link
       valid_lft forever preferred_lft forever
3: tun0: <POINTOPOINT,MULTICAST,NOARP,UP,LOWER_UP> mtu 1500 qdisc pfifo_fast state UNKNOWN group default qlen 100
    link/none
    inet 10.8.0.1/24 brd 10.8.0.255 scope global tun0
       valid_lft forever preferred_lft forever
    inet6 fe80::2fa5:3d20:6dff:99d9/64 scope link flags 800
       valid_lft forever preferred_lft forever
准备 OpenVPN 客户端配置文件
配置文件说明
# 客户端配置文件,后缀必须是.ovpn
[root@4710419222 ~]$grep -v '^#' /usr/share/doc/openvpn-2.4.9/sample/sample-config-files/client.conf > /etc/openvpn/client/lujinkai/client.ovpn
[root@4710419222 ~]$sed -i '/^$/d' /etc/openvpn/client/lujinkai/client.ovpn
[root@4710419222 ~]$cat /etc/openvpn/client/lujinkai/client.ovpn
client  # 声明客户端
;dev tap # 接口类型,必须和服务端一致
dev tun
;dev-node MyTap
;proto tcp # 协议类型,必须和服务端一致
proto udp
remote my-server-1 1194  # server端的ip和端口,可以写域名但是需要可以解析成IP
;remote my-server-2 1194
;remote-random
resolv-retry infinite  # 如果写域名,就始终解析,当域名发生变化,会重新连接到新的域名对应的IP
nobind  # 本机不绑定监听端口,客户端是随机打开端口连接到服务端的1194
;user nobody
;group nobody
persist-key
persist-tun
;http-proxy-retry # retry on connection failures
;http-proxy [proxy server] [proxy port #]
;mute-replay-warnings
ca ca.crt
cert client.crt
key client.key
remote-cert-tls server # 指定采用服务器证书校验方式
tls-auth ta.key 1
cipher AES-256-CBC
verb 3
;mute 20
修改客户端配置文件
client
dev tun
proto tcp
remote 47.104.192.22 1194
resolv-retry infinite
nobind
ca ca.crt
cert lujinkai.crt
key lujinkai.key
remote-cert-tls server
;tls-auth ta.key 1
;cipher AES-256-CBC
verb 3
mute 20
Windows 配置部署 OpenVPN 客户端
将客户端相关文件下载下来:
[root@4710419222 lujinkai]$pwd
/etc/openvpn/client/lujinkai
[root@4710419222 client]$ll lujinkai
total 20
-rw------- 1 root root 1172 Oct  4 19:25 ca.crt
-rw-r--r-- 1 root root  436 Oct  7 18:05 client.ovpn
-rw------- 1 root root 4438 Oct  4 19:25 lujinkai.crt
-rw------- 1 root root 1704 Oct  4 19:25 lujinkai.key
[root@4710419222 client]$tar cvf lujinkai.tar lujinkai/
lujinkai/
lujinkai/lujinkai.key
lujinkai/client.ovpn
lujinkai/ca.crt
lujinkai/lujinkai.crt
[root@4710419222 client]$ll
total 24
drwxr-xr-x 2 root root  4096 Oct  7 18:28 lujinkai
-rw-r--r-- 1 root root 20480 Oct  8 10:57 lujinkai.tar
[root@4710419222 client]$sz lujinkai.tar
rz
Starting zmodem transfer.  Press Ctrl+C to cancel.
Transferring lujinkai.tar...
  100%      20 KB      20 KB/sec    00:00:01       0 Errors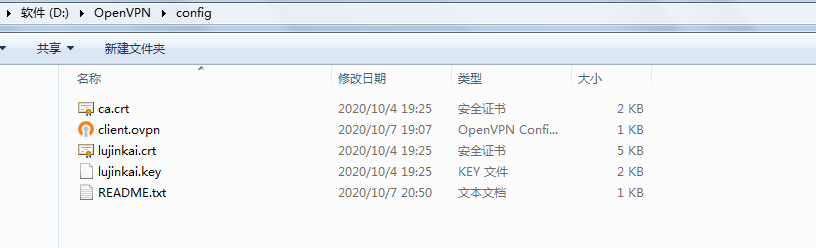
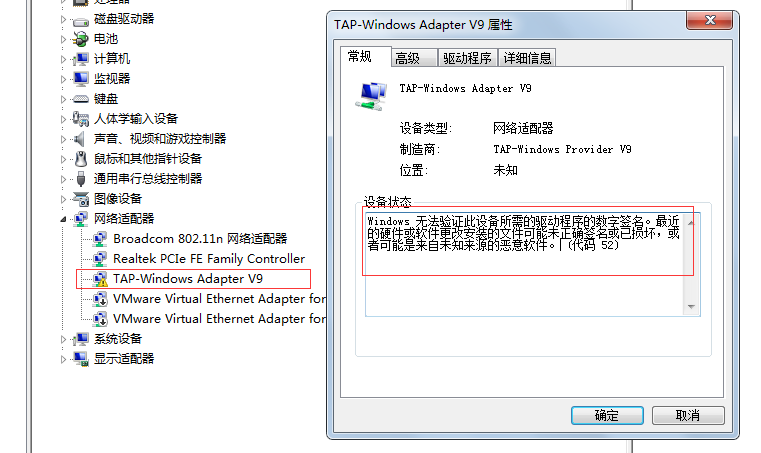
注意:tap 网卡驱动可能因为缺少数字签名无法启动,可以在开机的时候按 F8,然后禁用校验驱动的数字签名,可是这样只能当次开机有效,不知道怎么彻底解决。。。
Mac OS 配置部署 OpenVPN 客户端
略。。。