hexo
本文最后更新于:2023年12月5日 晚上
部署在服务器
参考: https://hexo.bootcss.com/docs/github-pages.html
安装 node 和 git
过程略…
安装 hexo
npm install -g hexo-cli手动创建 hexo 目录,进入 hexo 目录,初始化
hexo init # 这一步比较慢,如果太慢,先打开cmd,ping github.com默认主题不好看,下载使用 next 主题
rm -f _config.landscape.yml
编辑package.json 删除 hexo-theme-landscape
npm install

npm install hexo-theme-next@latest
vim _config.yml  # theme: next
cp node_modules/hexo-theme-next/_config.yml _config.next.yml
配置 github
ssh-keygen -t rsa -C "441757636@qq.com"
ssh -T git@github.com
cat ~/.ssh/id_rsa.pub
ssh-rsa AAAAB3NzaC1yc2EA...省略...= 441757636@qq.com
登录 github,添加新 ssh key,内容就是 id_rsa.pub
写博客,位于 source/_posts 目录
配置 nginx,根目录在 hexo/pulic
部署在 github
npm install hexo-deployer-git --save
git config --global user.name "ljkk"
git config --global user.email "441757636@qq.com"
vim _config.yml
deploy:
  type: git
  repo: git@github.com:ljkk/ljkk.github.io.git
  branch: main
hexo clean && hexo deploy后续有博客更新,直接执行hexo clean && hexo deploy即可
优化 NEXT
添加 algolia
默认情况下,algolia 只会搜索 标题、时间、摘要、分类、标签等关键信息,不会进行全文搜索
安装 hexo-algolia,next 主题内置了 algolia
npm install hexo-algolia --save新建 index,类似对象存储的空间,建议以网站名命名
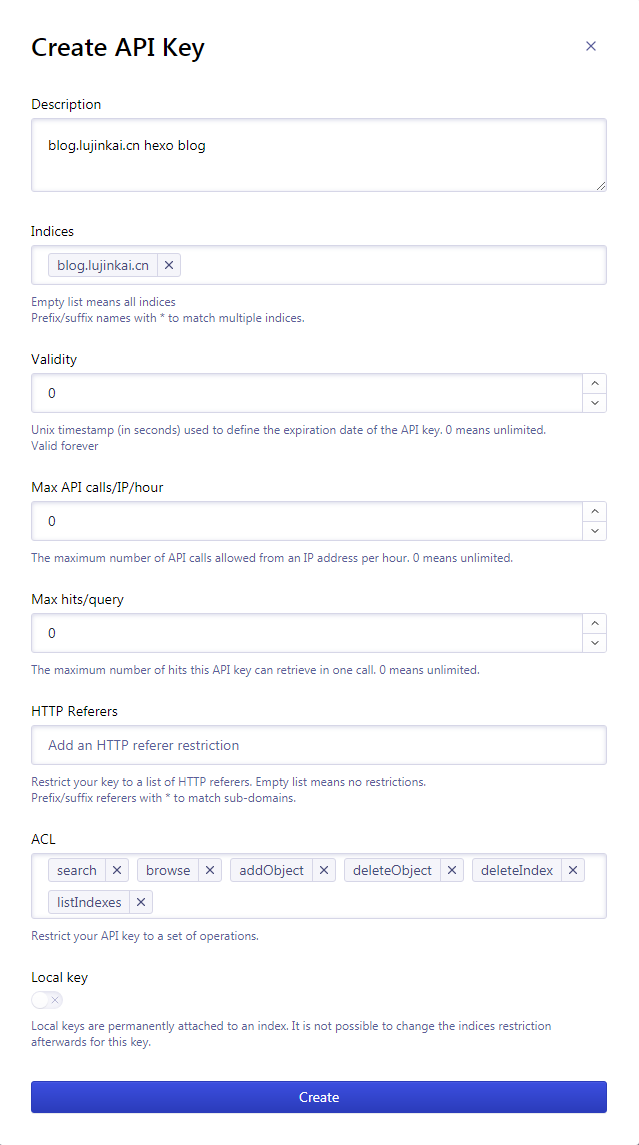
左侧 API Keys –> All API Keys –> New API Key
配置 _config.melody.yml
algolia_search:
  enable: true
  hits:
    per_page: 12
  labels:
    input_placeholder: Search for Posts
    hits_empty: "We didn't find any results for the search: ${query}" # if there are no result
    hits_stats: "${hits} results found in ${time} ms"
配置 _config.yml
algolia:
  applicationID: 'Application ID'
  apiKey: 'Search-Only API Key'
  indexName: 'blog.lujinkai.cn'
生成索引
export HEXO_ALGOLIA_INDEXING_KEY='刚生成的API Key'
hexo algolia
查看效果
hexo s

后续更新了文章,也需要更新索引,执行:
export HEXO_ALGOLIA_INDEXING_KEY='刚生成的API Key'
hexo algolia
推荐相关文章
npm install hexo-related-popular-posts
hexo clean
# vim _config.yml
related_posts:
enable: true添加 gitalk 评论插件
略…
优化分类
每篇笔记都手动编辑分类,这显然不是科学的方法,可以通过插件根据目录实现自动生成分类
https://github.com/xu-song/hexo-auto-category
npm install hexo-auto-category --save
hexo clean && hexo s
修改首页样式
所以需要改一下,我前端水平一般,没找到在哪里配置,只好修改源码,但是原则上尽量不直接修改,而是先继承再修改
修改 themes/next/layout/_macro/post.njk,只修改一行,给最外层的 div 添加一个类
<div class="post-block {%- if is_index %} ljk-index-post-block{%- endif %}">
...
</div>
我用的是 Gemini 样式,进入 themes/next/source/css/_schemes/Gemini,将 index.styl 重命名 index.orgi.styl,然后新建 index.styl,内容如下:
@import './index.orgi';
// Modified by Lu Jinkai

.main-inner > .sub-menu:not(:first-child):not(.sub-menu), .main-inner > .post-block:not(:first-child):not(.sub-menu), .main-inner > .tabs-comment:not(:first-child):not(.sub-menu), .main-inner > .comments:not(:first-child):not(.sub-menu), .main-inner > .pagination:not(:first-child):not(.sub-menu) {
    margin-top: 0px;
}
.ljk-index-post-block {
    padding: 12px 20px;    // 这里写死了,不太好,post-block是自适应的
    .post-header {
        margin-bottom: 0;
        text-align: left;
    }
    .post-header .post-title {
        font-size: 1em;
        // white-space:nowrap;
        // overflow: hidden;
        // text-overflow: ellipsis;
    }
    .post-header .post-meta-container {
        font-size: 0.4em;
        margin-top: 0px;
        .post-meta {
            justify-content: flex-start;
            .post-meta-item-icon,.post-meta-item-text{
                display:none;
            }
            .post-meta-item {
                time {
                    cursor: default;
                }
                time[itemprop="dateModified"] {
                    display: none;
                }
                &::before {
                    content: '';
                    margin: 0 ;
                }
                &:last-child a {
                    color: #999;
                    &:hover {
                        color: #888;
                    }
                }
                &:last-child::before {
                    content: '|';
                    margin: 0 0.2em 0 0.6em;
                }
                &:first-child::before {
                    display:none;
                }
            }
        }
    }
    .post-body {
        display: none;
    }
}

.pagination {
    margin: 0;
}